Eastsound Custom Woodcraft Inc. is a company established in 2000, located in Eastsound, Washington on Orcas Island. With a background in boatbuilding, we do home construction remodels as well as new construction with an emphasis on interior joinery.
Saturday, August 14, 2010
August update
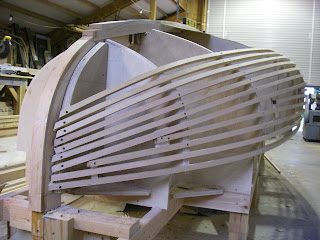
Here's an update on the boat. I'm about 1/2 way down the 2nd layer of veneers and once I get through the tough turn I'll step up to a wider plank

Sunday, July 11, 2010
So here's the 1st layer of veneer as I head back aft towards the stern. If you haven't dealt with "edge set" before, cold molding a boat will make it very clear. It's all about letting your plank lay naturally before you spile. I'm using plastic binding strap off of a job site to hold down the planks and in regards to staples, on this 1st layer I've found my best luck with 3/8" and 1/2" staples fired from a gun that uses T-50 staples. The green tape you see is just barely catching the oak apron and sternpost to keep the glue from passing on down the side


Saturday, June 26, 2010
Sunday, June 20, 2010
Probably not an OSHA approved maneuver but here's how I cut the scarfs for my ribbands.....I did an 8:1 cut and it seemed to work like a champ. I cut and glued up a dozen or so after work Friday night and finished installing them over the weekend.....
I'll now get into fairing the apron, stem and stern post in preparation to planking.......


I'll now get into fairing the apron, stem and stern post in preparation to planking.......


Tuesday, June 15, 2010
Here's a pic of the mizzen mast I made back in Febuary. It's a hollow "birdsmouth" mast made of some old growth fir I had laying around the shop. I put solid blocking at the place of shrouds, the area of the boom as well as the top and butt so I should be pretty well covered for any fastenings I need to use. I glued it using west system, clamped with a hose clamp and then used wire ties before moving down the length of the mast. 

Saturday, June 12, 2010
Just to take a step back, here's the loft floor set up using the nails to transfer the lines to my molds. I used a stapler to hold the sheet rock nails in place......


For the last week I'm been installing ribbands to the molds. After looking at options I decided to use fir and to deal with the tight turn in the stern i first ripped down to 7/8 and then on my bandsaw ran a kerf in what ever distance I needed to get back into the softer turn of the hull. I then ran the ribband back through my planer down to a finished thickness of 3/4". As for the lengths, I spliced them as recommended in Gougeon Bros. book with epoxy the previous day.....


For the last week I'm been installing ribbands to the molds. After looking at options I decided to use fir and to deal with the tight turn in the stern i first ripped down to 7/8 and then on my bandsaw ran a kerf in what ever distance I needed to get back into the softer turn of the hull. I then ran the ribband back through my planer down to a finished thickness of 3/4". As for the lengths, I spliced them as recommended in Gougeon Bros. book with epoxy the previous day.....
Sunday, May 9, 2010
Bill Garden Canoe Yawl
Subscribe to:
Comments (Atom)


