Thursday, May 7, 2020

Social Distancing

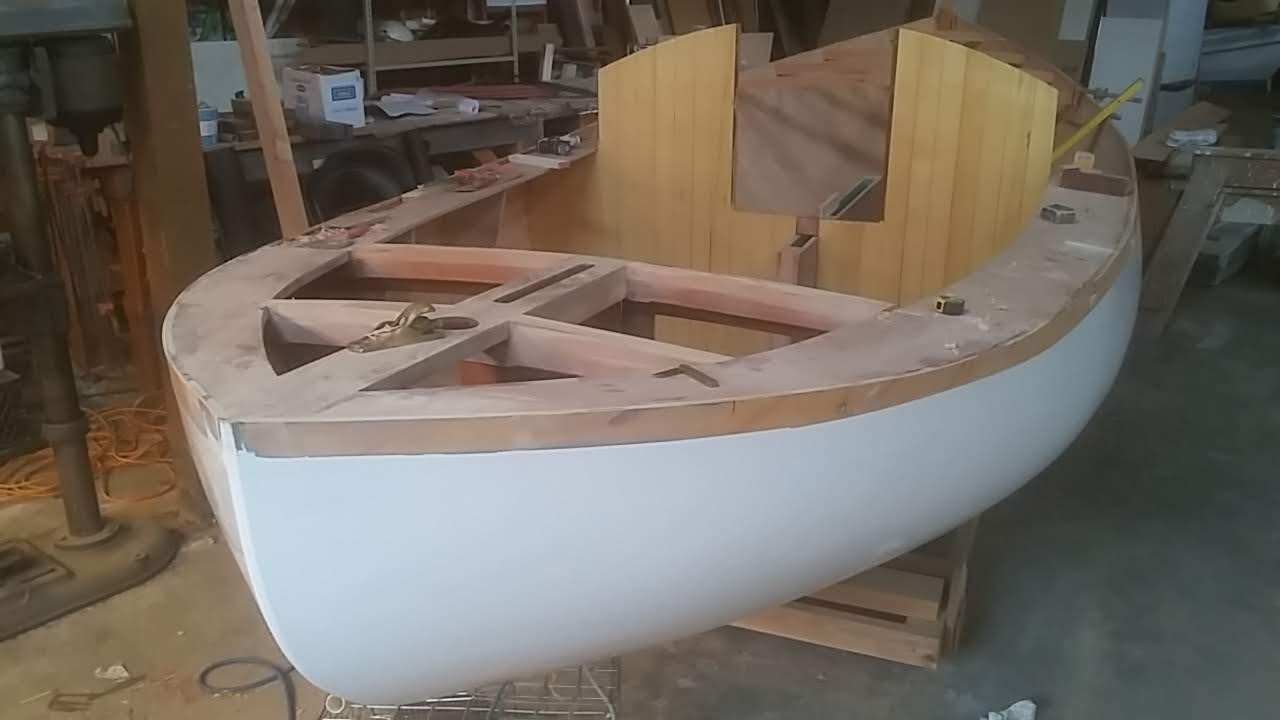
On March 23 2020 Washington St issued a statewide stay at home order to help stop the spread of the covid 19 virus.  Initially ordered for 2 weeks it was pushed out to May 31st., so what better way to spend this time than down at the shop.
I started off by rechecking the boat for level, side to side as well as fore and aft.  At that point it was time to take 1/8" door skin and produce a pattern for both bulkheads, the main bulkhead that will be the back of the cabin and the bulkhead that will create the aft end of the cockpit.
I then took the patterns and created the 2 bulkheads from 1/2" marine ply.  Once I had them fitting the way I wanted they were both covered with 1/8"  X  2 1/2" strips of left over yellow cedar planking stock.  V-grooves were created with a router run down a straight edge to create the appearance of tongue and groove that'll later be painted.

Next up, harpins.  In this build they take the place of a sheer clamp that'll run the length of the boat.  They'll be in 2 lifts of 3/8" ply and after patterns were made they were checked for fit before applying epoxy to the bottom side. 

After both layers were installed it was then time to add the final lift to the aft deck beams.
With a flexible batten I began fairing the aft deck in prep for the 3/8" plywood deck.


Time for the floors that'll support the cockpit floor
Laminated from a pattern made from the hull, cockpit bench supports were glued and installed.  A router jig was made to let in seat support framing


More to come!


Wednesday, March 28, 2018

.........And finally,
The boat was then rolled over, I removed all the molds and as time allowed I cleaned up the interior and coated with 4oz. cloth and another 3 coats of epoxy.
And for fun made up a jig for laminating deck beams
 
Once the inside was all coated I began putting together the rudder trunk which I picked up off the loft floor.  The trunk itself is was coated with cloth, epoxy, primer and bottom paint before installing.
Here you can see the finished trunk and the aft deck beams in place.

Next up was the step for the mizzen mast and mast partner made from white oat that runs the full length of the aft deck.
The oak partner will eventually be shaped to the camber and the beams are dropped down 3/4" along the sheer to allow for the typical Bill Garden Harpin detail that will run the full length of the boat.  This harpin will be 2 layers of 3/8" plywood,  more or less the width of the side decks, and once installed I'll go back and put a final lift on all the deck beams flushing out with the harpin 
Nice big drain at the bottom of the step

Fwd beams all fit.  I'll remove one more time, bulnose the bottom side and re-install for keeps.

At this point I'm laying out the 2 sides of the centerboard trunk. It's been clothed and coated with epoxy and graphite
 

Another 14 months and little progress but thought I'd take a step back and fill in some blanks with pictures I've taken along the way.

This is the final layer of yellow cedar being spiled working my way aft.  Once I had every piece laying the way I liked, I'd lay down tick marks for reference, then remove, glue, and re-apply a couple veneers at a time.
 
I then sanded off and on for weeks when I had 20 minutes here, 20 minutes there, eventually getting it where I though it should be.  To make sure I lightly sprayed a dusting of gray primer and re-sanded, followed by 3 coats of epoxy over 4oz. fiberglass cloth.

Time for couple coats of 2 part epoxy primer
2 coats of Pettit Brightside, rolled and tipped

Re-established the waterline and applied a couple coats of bottom paint


Monday, December 12, 2016

Finally!!  It's been a crazy 6 years but finally my little yawl is turned over

Thursday, January 13, 2011

.........and speaking of Australia

Here's a couple pictures of the boat my brother and I built for his son on my last visit to Geelong just South of Melbourne 2 years ago

New Years

It's been a while since I've updated. I went back to work on the house after August but here I am getting the final piece applied of the 2nd layer of 4.
I'm off to Australia to visit family next week.

Saturday, August 14, 2010

August update

Here's an update on the boat. I'm about 1/2 way down the 2nd layer of veneers and once I get through the tough turn I'll step up to a wider plank

Sunday, July 11, 2010

So here's the 1st layer of veneer as I head back aft towards the stern. If you haven't dealt with "edge set" before, cold molding a boat will make it very clear. It's all about letting your plank lay naturally before you spile. I'm using plastic binding strap off of a job site to hold down the planks and in regards to staples, on this 1st layer I've found my best luck with 3/8" and 1/2" staples fired from a gun that uses T-50 staples. The green tape you see is just barely catching the oak apron and sternpost to keep the glue from passing on down the side

Saturday, June 26, 2010

I thought I'd pass along a picture of the hull about ready for planking. The hull will be covered with 4mil plastic, the planking stock will be sorted according to widths and lengths and off i go with the 1st layer of veneers.....Probably get started next weekend

Sunday, June 20, 2010

Probably not an OSHA approved maneuver but here's how I cut the scarfs for my ribbands.....I did an 8:1 cut and it seemed to work like a champ. I cut and glued up a dozen or so after work Friday night and finished installing them over the weekend.....
I'll now get into fairing the apron, stem and stern post in preparation to planking.......

Tuesday, June 15, 2010

Here's a pic of the mizzen mast I made back in Febuary. It's a hollow "birdsmouth" mast made of some old growth fir I had laying around the shop. I put solid blocking at the place of shrouds, the area of the boom as well as the top and butt so I should be pretty well covered for any fastenings I need to use. I glued it using west system, clamped with a hose clamp and then used wire ties before moving down the length of the mast.

Saturday, June 12, 2010

Making my way around the turn back aft.....
Here's the kerf I was explaining. By kerfing first, I'm able to then plane down to the finished dimension

Here's the apron being laminated from 3 layers of white oak with 12" half laps glued with West Systems G-Flex meant for difficult to glue woods.. The layers themselves were glued and screwed. The stem and sternpost were made from 3/16" lifts of Doug. Fir.
Just to take a step back, here's the loft floor set up using the nails to transfer the lines to my molds. I used a stapler to hold the sheet rock nails in place......


For the last week I'm been installing ribbands to the molds. After looking at options I decided to use fir and to deal with the tight turn in the stern i first ripped down to 7/8 and then on my bandsaw ran a kerf in what ever distance I needed to get back into the softer turn of the hull. I then ran the ribband back through my planer down to a finished thickness of 3/4". As for the lengths, I spliced them as recommended in Gougeon Bros. book with epoxy the previous day.....

Sunday, May 9, 2010

Bill Garden Canoe Yawl

Here's the molds set up with the laminated fir stem in place

Bill Garden Canoe Yawl

The fir stem glued and clamped

I've started building Bill Garden's 18'6" Canoe Yawl, and as of today lofting has been completed, molds set, both stem and sternpost laminated and placed. Pictures will soon be posted.

Bill